Hedgehog Doorstop

Hi friends! I have a fun pattern/tutorial to share with you today for this hedgehog doorstop. Here’s some tips before we get started.
Choose a good quality felt. I prefer wool felt but it is getting harder to find at my local craft stores. Hobby Lobby has a decent selection of nicer felt by the sheet.
As for the fur I picked up the light pink at Hobby Lobby and the brown at Joann. Fur can be pricey but if you use a coupon for the small amount required it’s not too bad. Also check for fur in the remnant fabrics. I find it quite often for a steal of a deal in the remnant section.
Alright, let’s get sewing.

Supplies
Pattern (DOWNLOAD HERE)
¼ yard fur
¼ yard lighter felt (or 2 sheets)
Sheet of darker felt
Black felt for eyes and nose
Heat n Bond Iron-on Adhesive
Craft Knife
Embroidery thread/hand needle (optional)
chalk/cotton ball (optional)
**¼” seam allowance unless otherwise stated.

Take your pattern pieces for your eyes, nose, and muzzle and trace them on the smooth side of your HeatnBond. Adhere the HeatnBond to your felt, nose and eyes to the black felt and the muzzle to your darker felt.

Following the requirements on your pattern pieces, trace and cut out each piece.
Light felt: cut two ears and the face
Darker felt: cut the muzzle, four paws, and the base
Fur: trace two of the main body piece with the pile of the fur upside down. So the fur is aimed up instead of down. To cut out the fur, use a craft knife to slice through the backside of the fur. This will keep the fur from getting a trim so the length stays long along the cut line and is less messy.
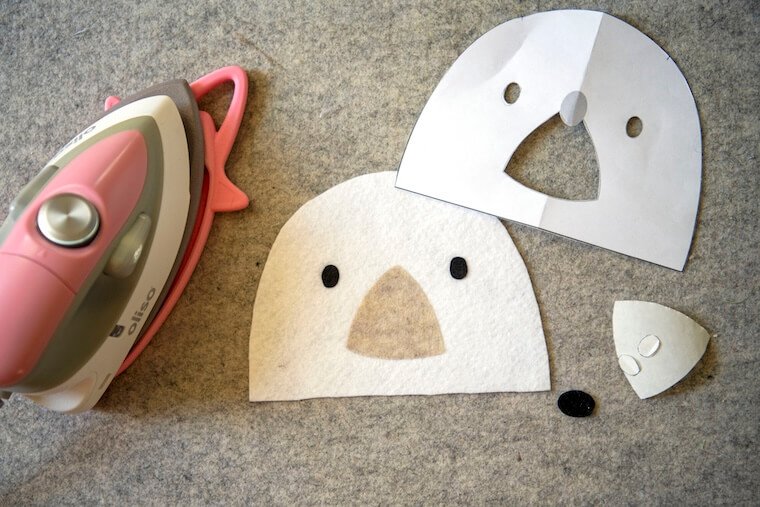
Let’s start by sewing the facial features on the face. To easily find the placement of each piece, I cut out the placement guide from the face pattern. Iron the eyes and muzzle in place using a barrier cloth to protect the felt. Top stitch around each piece pulling your thread tails to the back and tying off to keep the front stitches looking nice and clean. Repeat with the nose.

Next grab your embroidery thread and stitch on a couple of eyebrows and any other details you’d like. I used a cotton ball and chalk on my pink hedgehog to give her some rosy cheeks.

OK, let’s get those ears just right. Grab the ears and fold the sides in along the bottom about ⅛” and tack them in place.

Place your face over one side of your fur body lining them up along the bottom edge and centered. Find the ear placement and slide the ears under the face about ¼”. Tack them in place.

After tacking the ears down, place your face piece back over top, lining it up and pinning. Make sure your fur is smooth as you pin so you don’t get any weirdness going on. Top stitch around the perimeter of your hedgehog’s face.

Awesome. Let’s get your paws prepped. Take all four paw pieces and sew the darts using our ¼” seam allowance. Next, match the seams up and pin the paws together leaving the bottom straight edge open. Sew and turn right side out.

Fill your paws with a little bit of Poly-fil. You do not want too much because you still need to sew them onto the body which will be difficult to do if over-filled. Sew the opening of the paw closed using a running stitch. Pull the stitches until the raw end of the paw is approximately 1.5” wide and tie it to hold in place. Repeat with the other paw.

To attach the paws, line the bottom raw edge with the bottom edge of the face with the outside edge of each paw aligned with the outside edge of the face. Tack in place.

Fabulous, let's sew the body together now. First, line up the darts on each fur piece and sew.

Next, line those two seams up and pin. Pin down both sides of the fur leaving the bottom edge open. Sew.

Turn your hedgehog right side out. Using a straight pin gently pull out the fur that’s stuck in your seam.

Turn your hedgehog body inside out again. Take your base piece and fold in half, finding the center of both ends. Line those center points up with the side seams of your body and pin. Pin around the front then around the back leaving a 4-inch opening along the back for turning.
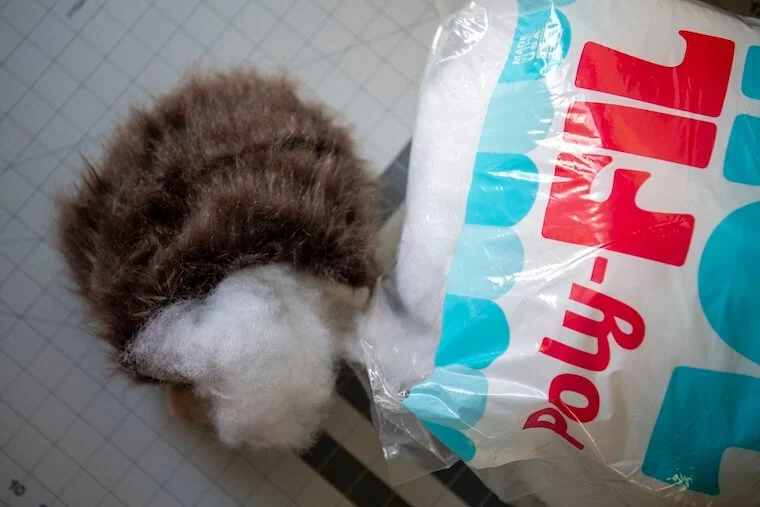
Sew. Turn right side out through your 4-inch opening. Fill with Poly-fil.

In the very bottom, add a cup and a half to two cups of the Poly-pellets. They weigh the hedgehog down so that he can hold the door from closing.

Sew the opening closed and you are done!

Now you’ve got a little hedgehog who looks like he’s burrowed under your door and holds it open for you. Ha! So fun. He’d make a cute shelf sitter as well. Thanks so much for sewing with me today! If videos help you out, I did post a Reel tutorial on my Insta for this pattern as well (@StubbornlyCrafty). Happy sewing!