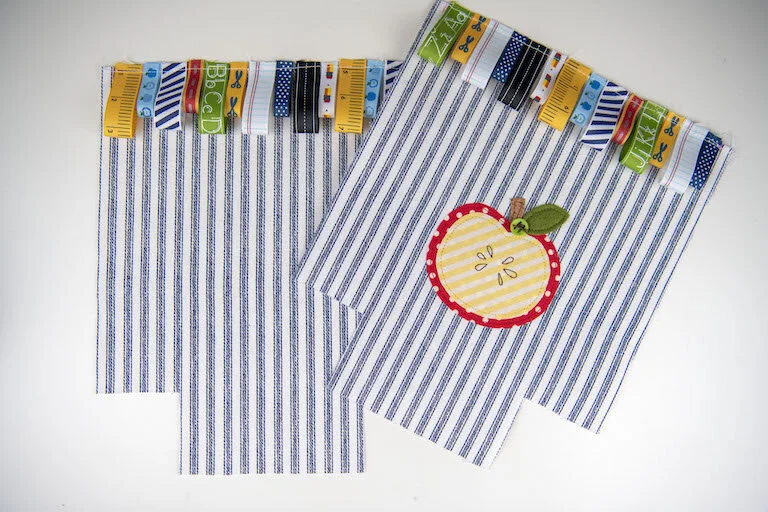
Canvas Basket Pattern and Tutorial

Today I am going to share a quick tutorial on how to make a fun little canvas basket. I’ll be showing a super simple, super quick version as well as a more intricate variation. Both fab. The simple variation is one of the quickest projects I’ve ever made. It’s perfect for when you need to whip something up to put a sweet treat and card in for a friend’s birthday to make it just a little more spectacular. I’m making one for my first grader’s teacher. My first grader loves to draw pictures and give gifts, so she filled it with things her class needed as well as a treat and card.

You can make it out of quilters cotton as well. I made these two just out of quilters cotton without any interfacing. It’d be cute tied with a ribbon or fastened with a clothes pin or safety pin as a gift bag, too.

Supplies:
PDF Pattern: print out the pattern here, cut it out, and tape with dotted lines matched up
For this basket you’ll need ⅓” yard of two coordinating canvas fabrics.
**Ribbon version (at least one ⅜” ribbon spool and one ⅝”)
Cut the ⅜” ribbon to 3” strips and the ⅝” ribbon to 4” strips. You’ll need 14 of each (24 total).
Seam allowance is ¼”.

Iron your fabric. Use your pattern to trace and cut out two from both fabrics.
***You can find the pattern and tutorial on how to do the apple applique here. To find the placement for the apple, I measured 1” up from the corner cutouts and centered the bottom of the apple on that line.

To attach the ribbons, measure in ¼” along the top of each outer piece of your basket and make a mark on both ends. This is our seam allowance and we don’t want any ribbon in the way of our seam. Fold your first ribbon in half and place it next to the first mark with your raw edges along the top and pin. Make sure it isn’t right on your mark so it’s not accidentally caught in the seam allowance later. Continue folding your ribbons and pinning them along the top, alternating between a 3-inch piece and a 4-inch piece. Have the ribbons close together but not touching and stop once you get to your second mark.

Once you have them pinned and looking how you’d like, use a ⅛” seam allowance to tack them in place.
Repeat along the top of your second outer basket piece.
WITHOUT RIBBON VERSION START HERE:
Ok, that’s it for the fancy version. The remainder of our tutorial is for both the fancy and simple version.

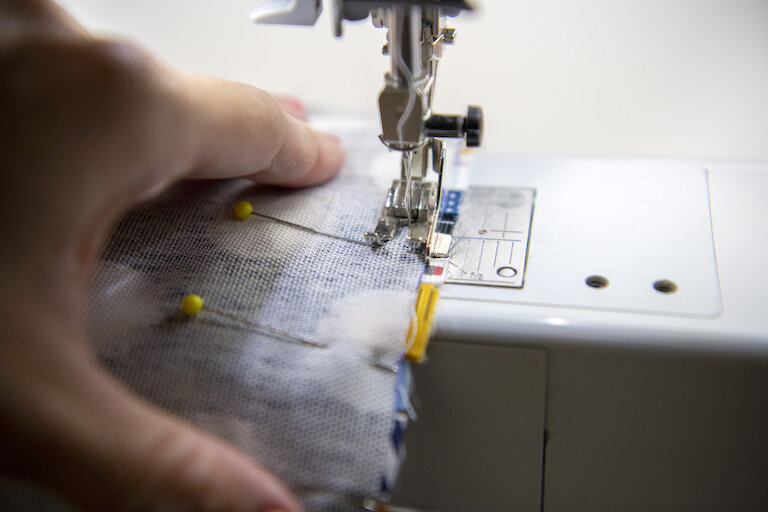
Take your two outer basket pieces and place them, right sides together. Pin along the sides and bottom leaving the top edge and the boxed out corners alone. Sew using your ¼” seam allowance remembering to back stitch at the beginning and end.

If you’ve added the ribbon, double-check that you didn’t catch it in your seam allowance. If you did, pick your seam and try it again. Now, let’s box our corners. Stick your hand in the top opening (your basket is still wrong sides out) and open the bottom corner so the two seams come in and meet each other.

Pin the seams together and then pin along the opening.

Repeat on the other corner. Sew.

Turn right side out. Set aside and grab your lining pieces.

Repeat the same steps for your lining pieces except leave a 3” opening on one side of your lining (where the pins are is where my opening will be). This is for turning our basket right side out when finished. Make sure your opening is closer to the bottom than the top since the top of our lining will be showing when finished.

When finished, place your main basket inside your lining, right sides together.

Pin the two together by lining up and pinning the side seams. If you’re doing the ribbons, make sure they are facing down and sandwiched in between. I’ve been called an over-pinner a time or two. You do you. :)
Sew all the way around the top using your ¼” seam allowance and remembering to back-stitch at the beginning and end.

Pull your basket out of the opening in your lining’s side seam and turn it right side out.

Sew your opening closed.

Iron your top seam flat, then top-stitch. Fold the top of your basket down and you’re finished!t

That’s it! Simple and addictive. I hope you found my many photos helpful. I’m a visual learner so I usually over-photograph the steps since that's how I learn.